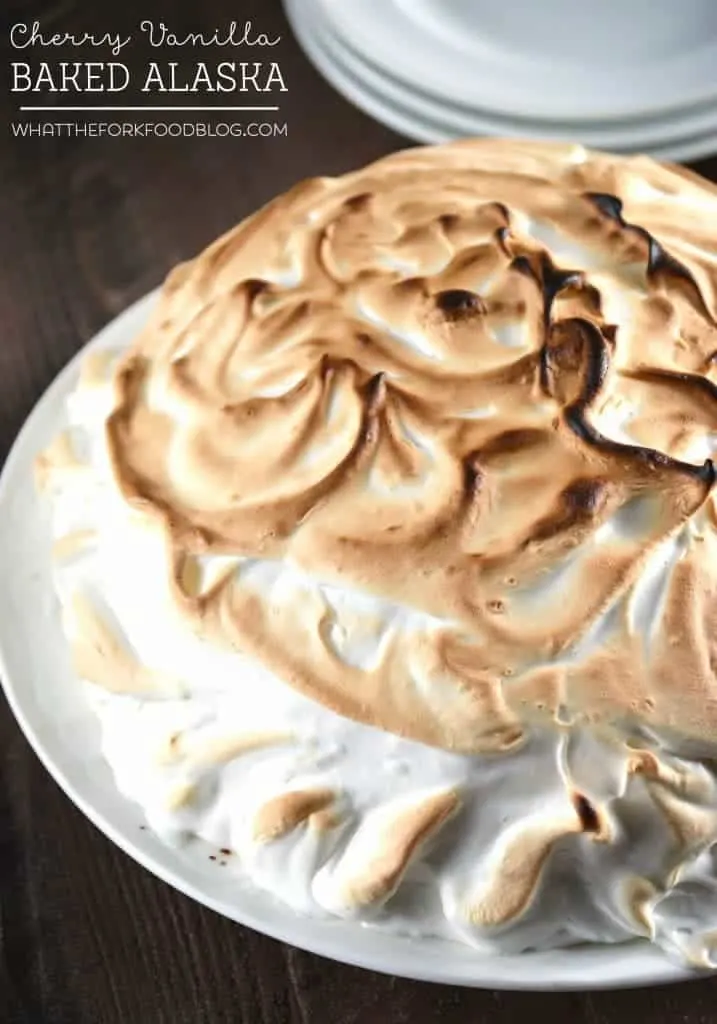
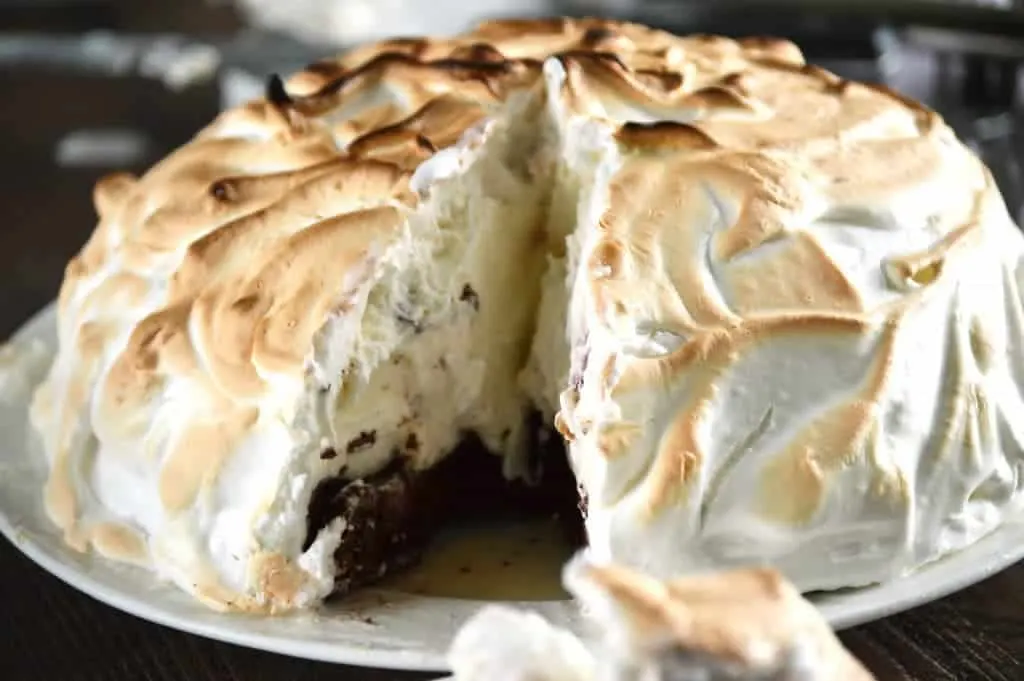
This Gluten Free Cherry Vanilla Baked Alaska is a fun twist on the retro dessert. A flourless brownie is covered in homemade cherry vanilla ice cream and coated in a toasted sweet meringue. It’s a classic that will leave you coming back for more.

Gluten Free Cherry Vanilla Baked Alaska
What is Baked Alaska? It’s got a funny name that makes me think of Super Troopers in Alaska: The Last Frontier.
Of course, you can think all the funny things you want but seriously, Gluten Free Cherry Vanilla Baked Alaska is downright delicious. The base of this decadent dessert is a flourless brownie.
It’s actually the same brownie base that I use in my Flourless Chocolate Mint Brownies. They’re rich and über fudgy.

The brownie is then topped with the most amazing cherry vanilla ice cream. I made my own with fresh cherries that I had leftover from Kelsey’s birthday cake.
Kelsey had gotten some cherry vanilla ice cream on a recent trip to the UCONN diary bar so that was my inspiration for the ice cream layer.
Then both layers are covered in a sweet meringue. If you’ve never made meringue, don’t despair. It’s not nearly as hard as I thought it would be. And yes, this was my first ever meringue.
A few tips on making the meringue:
- Make sure the bowl and whisk you use are super clean and dry.
- Important about the egg yolks- Make sure there is absolutely NO yolk in the egg whites. Even a spec will keep the meringue from setting.
- Don’t attempt this on a humid day.
- DO NOT use the liquid egg whites found in a carton!
- Make sure your egg whites are room temperature. Eggs are easier to separate when they’re cold so you can separate the eggs and then leave the whites in a covered bowl until they reach room temp.
- Use a glass or metal mixing bowl – not plastic.
- Make sure you have a bowl with plastic wrap covering 2 to 3 inches over the side
- Use fresh eggs.
- Let the brownies cool completely.
All the tips make it sound like meringue can be finicky. It can be but don’t let that intimidate you! Meringue can be just as easy to make as whipped cream when you follow the tips. They’re more like a guideline to success.
Plus, the toasted meringue is probably my favorite part about this Gluten Free Cherry Vanilla Baked Alaska Recipe. It tastes almost like toasted marshmallows that is amazing with the ice cream and brownie.
So good. Enjoy!

be sure to follow me on instagram and hashtag #whattheforkfoodblog or tag @whattheforkfoodblog – i love seeing what you make!
if you love this recipe for cherry vanilla baked alaska , be sure to follow me on social media so you never miss a post:
| facebook | twitter | pinterest | instagram | youtube |

Cherry Vanilla Baked Alaska (gluten free)
Ingredients
For the Brownie Base
- 1/3 cup cornstarch
- 1/4 cup cocoa powder
- 1/2 tsp fine sea salt
- 1 12 oz. package semi-sweet chocolate chips
- 6 Tbsp unsalted butter cut into 1 tbsp pieces
- 3/4 cup granulated sugar
- 3 large eggs
- 1 tsp vanilla
For the Ice Cream
- 2 C heavy cream
- 1 C whole milk
- 3/4 C granulated sugar
- 1 Tbsp pure vanilla extract
- 1 tsp almond extract
- 2 C fresh cherries pitted and halved
For the Meringue
- 4 egg whites room temperature – DO NOT USE EGG WHITES FROM A CARTON
- 1/4 tsp cream of tartar
- pinch of salt
- 1/2 C sugar
Instructions
- Line a medium size bowl (with a 9 inch diameter) with enough plastic wrap so that the sides are completely covered and there is at least 2-3 inches overhanging on all sides.
- To make the ice cream, whisk together the heavy cream, whole milk, sugar, vanilla extract and almond extract. Pour into the bowl of a 2 quart ice cream maker and churn according to manufacturers directions. Add the cherries to the mixture about 5 minutes before the ice cream is done churning.
- When the ice cream is done, transfer the ice cream into the prepared bowl, cover with plastic wrap and freeze at least 8 hours or overnight.
- To make the brownies, preheat oven to 350 degrees and line a 9 inch round cake pan with parchment paper. The parchment can overhang the sides, it won’t affect the brownies.
- Add the chocolate chips and butter to a microwave safe bowl and melt at 50% power for 1 minute. Stir well and continue to melt the chocolate chips/butter at 50% power for 20 second intervals (stirring in between) until the chocolate is melted.
- Stir in the sugar and add the eggs one at a time. Stir in the vanilla extract then add the cornstarch, cocoa powder and salt. Mix until combined.
- Transfer the batter to prepared round baking pan and bake at 350 degrees for 30-35 minutes or until a toothpick comes out clean. Cool the brownies completely in the pan.
- When the brownies are completely cooled, place on a large flat, oven proof plate, at least 10-12 inches in diameter. Carefully use the overhanging plastic wrap to pull the ice cream out of the bowl and invert onto the brownie to make a dome shape. You can keep the ice cream covered with the plastic wrap and keep in the freezer until you make the meringue.
- To make the meringue, add the egg whites, cream of tartar and a pinch of salt to bowl of a stand mixer. Use the whisk attachment and whisk the egg whites on medium high speed for at least two minutes or until soft peeks form. With the mixer still running, slowly add the sugar and continue to beat the egg whites until stiff peaks form. To test if the meringue is stiff, stop the mixer, remove the whisk and use it to scoop up some of the meringue. If the meringue holds its shape and doesn’t start to droop/fall off the whisk, it is stiff enough to work with.
- Preheat the broiler and remove the baked Alaska from the freezer and remove the plastic wrap. Use a spatula to cover the ice cream and brownie with the meringue until the whole thing is covered.
- Place the Baked Alaska under the broiler, about 3-5 minutes to cook and brown the meringue. To prevent the top from getting too brown/burned, place a piece of aluminum foil on top after it browns so the sides can also brown.
- Serve immediately or freeze until ready to eat. You may need to let the Baked Alaska sit at room temperature for 5-10 minutes for easier cutting as the brownie may be hard to cut through.
Nutrition Information
Disclaimers
As an Amazon Associate and member of other affiliate programs, I earn from qualifying purchases.
Nutrition Facts are estimated and aren’t always accurate. Please consult a doctor or nutritionist if you have special dietary needs.
PS this Baked Alaska recipe would be fabulous with Andes Mint Ice Cream instead of cherry vanilla for a Mint Chocolate Baked Alaska!
THIS POST CONTAINS AFFILIATE LINKS. YOU CAN READ MY FULL DISCLOSURE HERE. AS ALWAYS, THANK YOU FOR SUPPORTING WHAT THE FORK FOOD BLOG!


Leave a comment